Here are the materials to my EdCamp presentation. Tonight’s topic: Strategic Planning for Innovative Pedagogical Practice with Technology.
Month: September 2014
Classroom Design: Generating Student Involvement
Have you ever had a class that your weren’t invested in? We’ve all been there. You enter a room and immediately look for the back corner. Take a seat in a solitary location and try to look interested while you take a nap with your eyes open. As a teacher, we try to create ways to motivate that back-row student. We create seating charts that force a child to the front of the room. They have to participate if they are right next to the teacher. We try different lesson plans. We try to get to know the student and find outlying causes of their seemingly lack of motivation. The question this week: Why does that back row of desks exist? What purpose does it serve in a modern classroom? How can we create a classroom environment that promotes student learning, participation, and investment?
The research this week taught me that layout, style, and even colors of a classroom can affect learning (O’Donnell, 2010 & Lee, 2014). Students need to feel welcome to the environment. They need to feel like their voice matters.
When public education first arrived students were sent through school with the intent of generating workers suitable to the times. “Victorian schools were designed to meet the particular needs of the Victorian era. They were created to turn out “obedient specialists”: adults who could work in factories, assembling components, or as domestic servants, not people who need to think for themselves.” – Sean McDougall, educational thinker and designer (O’Donnell, 2010).
Early classrooms were set up like this:

Does this look familiar? Students sitting in rows. Working on rote memorization. Now look at a classroom picture taken this year.

Society in this century is focused on creativity, individuality, and collaboration. So why are we still seating students in rows? How can we expect them to be productive or to care if we teach them in a way contradictory to what society requires of them? In the picture above, how are students being interactive, collaborative, or creative? Students in the back can’t even see the board!
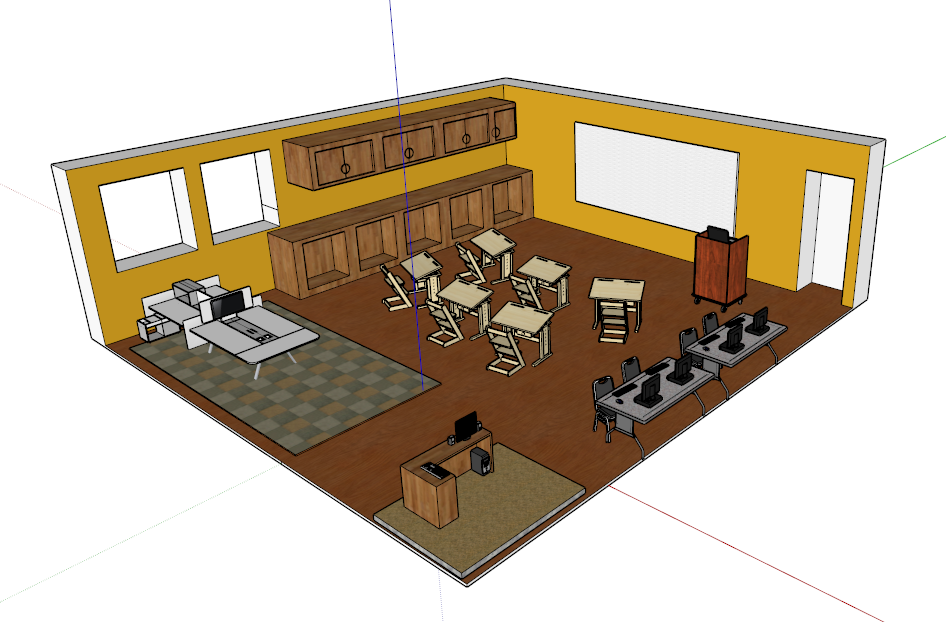
This week we were asked to redesign our classroom and modernize it to the 21st century. Teaching in an alternative school, where my room is a computer lab, this redesign is nearly impossible to implement due to wiring. Therefore, I designed my ideal math classroom. This classroom would still have a “front” with a projector and podium with a computer. But it would not just be for the teacher. This area is for students to present ideas as well as for the teacher to lecture. In higher levels of math, lecturing on more abstract concepts is a must. The desks are drafting tables and are lightweight; easy to move into pods of 2, 3, or 4 students. This area can also be used for students to work out ideas on their own.
This “lecture” area is not the only focus of the room. Along one wall, students would have access to computers. Here they would be doing research or reviewing the video or readings from the night before – this is a flipped classroom, of course. In the “back” of the room, on carpeted area, is a whiteboard table for collaboration. This table has a monitor for students to project to within their small group and is also wired to the main projector, as are all computers in the room. This allows students to share in small or large groups practically at will.
The cabinets are open providing easy access to manipulatives and materials. And there is a bulletin board on the “back” wall where students can post work or ideas and I can post challenging questions and puzzles for students to try solving. This is not in the diagram I created as that wall is lowered to better see into the classroom.
How would I go about implementing this in my own room? Furniture-wise I have many computers and tables in my room. We have recently installed, as a district, interactive projectors into every classroom. My teacher desk is immovable from the corner shown above due to wiring. The only major additional cost would be to the collaborative whiteboard tables. A solution to this would be to add a custom cut melamine to the surface of the tables I already have ($38.00 per table). The Apple TV I would like at this station costs around $300.00 so I may start with a simple computer monitor for $90.00. All told this would cost around $250.00 and a few people helping move the heavier furniture.
Lastly, if you look at the color scheme of the room you will see wood floors and warm, earth-toned walls adding a level of serenity to the environment. This is an impossible addition. But, a girl can dream.
This ideal classroom is what would work best for me, but not necessarily every teacher. An elementary room might include floor space for a reading corner. A science room would have lab tables. A different math teacher may put all students into pods. The room I’ve depicted is what would work for me with the experience I have so far as a teacher and the knowledge I have gained in my own coursework.
References:
Barrett, P., Zhang, Y., Moffat, J., & Kobbacy, K. (2013). A holistic, multi-level analysis identifying the impact of classroom design on on pupils’ learning. Building and Environment, 59, 678-689. doi: http://dx.doi.org/10.1016/j.buildenv.2012.09.016
Co.Design. (2014). Study Shows How Classroom Design Affects Student Learning. Fast Company & Inc. Mansueto Ventures. Retrieved from http://www.fastcodesign.com/
Education Portal. (2014). The Differences Between Online and Traditional Classroom Education. Retrieved from http://education-portal.com/articles/The_Differences_Between_Online_and_Traditional_Classroom_Educations.html
Lee, C. (2014). What Your Classroom Setup May be Saying to Students. Edudemic. Retrieved from http://www.edudemic.com/classroom-setup/?fb_action_ids=694559880791&fb_action_types=og.likes
Odonell, Wickland, Pigozzi & Peterson. (2010). The Third Teacher. Abrams; 1st Edition.
All pictures licensed under Creative Commons.
My First MOOC… Hypothetically Speaking
This week in CEP811 we researched MOOCs, Massive Open Online Courses. Our task this week was to create our own MicroMOOC. I found the task very interesting as I have participated in Coursera before. The course I have hypothetically created is much smaller in scope and length than those I have seen before and also more focused on collaboration – something technological pedagogy should capitalize on.
Purpose:
In my course, Character Creation: Casting Your Role in D&D, my peers will master building a character and its back story by designing a character and role-playing through different micro-scenarios.
Course Topic:
Creating a Memorable D&D Character
Course Title & Photo:
Character Creation: Casting Your Role in D&D

Audience:
This course is designed for people new to the game Dungeons and Dragons (5th editions) or those looking to spice up their character generation Due to some depictions of violence described in-game it is recommended that children under the age of 13 participate only with parent permission.
Target Skills:
- Players will be able to produce a game-ready character sheet
- Players will be prepared to react instantaneously with a response fitting of their character to any challenge they encounter
Projects:
- Players will generate a character background over the course of 4 weeks resulting in a playable character following the model for expansive learning.
- Question – How do you want to portray your character?
- Explore – Research the listed backgrounds in the Player Handbook and look up novel characters whose traits your character might be based on.
- Model – Post a forum about your character’s response to one of the week’s five challenges.
- Question – Is this the best way your character would present themselves in the situation?
- Explore – Look up the specific rules on what your character tried to do. Is it a feasible action?
- Model – Comment on your post and other’s giving productive critiques on their character’s actions.
Connections:
Throughout the course, players will be expected to collaborate with their peers in character development. While stats, abilities and rules will be a point of discussion, the purpose of this course is to define who your character is, what their goals are, and how they would respond in given situations. These will be presented via storied documents and artwork, presented via google drive. Players will primarily be working in forums to interact with each other as characters and as themselves. The multi-modal capabilities of drive will allow players to use representations of characters they are most comfortable with, whether it is a list, story, or picture. Different instructional design is also implemented as most of the course is dependent on peer-to-peer consultation and editing.
Design:
Week 1: Let us Play
- Question: What is a character and how are they played?
- Explore: Read the WikiHow Introduction to D&D
- Model: Discuss in the forum the type of character you are interested in playing. This is a brainstorm week and is focused on collaborating with peers to develop complexity of a character.
Week 2: Choose Your Weapon
- Question: This week is all about deciding on what role you want to take within the party. Are you a trickster? Good? Evil? Secretly harboring thoughts of glory? Or are you very vocal about it? We aren’t going to deal with any numbers this week. Focus on who you want your character to be.
- Explore: Research different character types.
- Look up characteristics of different races and classes.
- Research favorite characters from books you’ve read or movies you’ve seen.
- Model: Post a list of characteristics you want to present, as stoical or quirky as you like. Generate a sentence or two your character may say when introducing themselves.
- Example:
- Simplistic, blood thirsty, single-minded.
“My name is Maul. This is my friend Maul. Who is also a Maul.” – Dwarf Barbarian, weapon: maul.
- Simplistic, blood thirsty, single-minded.
- Comment on two-three other posts. How could their introduction better match the descriptive terms listed?
- Example:
Week 3: Where Are You Going, Where Have You Been?
- Question: Who are you as a character? Why do you do what you do?
- Read through Ash’s Guide to RPG Personality and Background
- Explore: Write a short story of your background. Pictures are welcome additions. Choose from a list of prompts or create your own.
- Model: Tweet to the class when your story is complete and then comment on someone else’s.
Week 4: Create Your Character.
- Question: How can I create a character that matches my background
- Explore: Read the chapters of the Player’s Handbook that relates to your chosen background
- Model: Design and Test Your New Character
- Part I: Following the Players Handbook fill out your character sheet. Refer to the forum for questions on rules or ideas as you are working.
- Part II: Set up a time with a group of 4-5 people and work your way through one of the listed micro campaigns (about 1 hour) as you work through the campaign take time to reflect on how you are presenting your character. Are you simply stating your actions or are you using the descriptive words and the persona we have developed in the past two weeks.
My course is designed to develop thinking about more than just the rules of the game. In my opinion, the how and why of things are what make them interesting. This course focuses on building each week individually following a blend of expansive learning and the pedagogies I have witnessed my online instructors using. Each week is a self contained lesson. Content builds within the lesson so students have a working model or thing that they have created and can take ownership of. This is used to fuel the next week and so on until the student has created a complex thing capable of being used in the real world.
One thing I really enjoyed exploring this week was P2PU. I was pleasantly surprised by the number of courses related to real-world application. The sale’s pitch being: If you want to be better at _______ then try taking this _____. It was very intriguing. The ease with which a course could be created and shared is astonishing to me.The course I designed above is modeled after this concept. I would really like to publish the course I designed above someday when I am not focused on master’s classes (maybe over a summer vacation). I’ll keep you posted.
References:
Bowie, J.A. (2014). Ash’s Guide to RPG Personality and Background. Retrieved from http://rpg.ashami.com/
khomesclip (2014). dragon wing. Retrieved from deviantart.com
Molomo, B. (2011). The Game Object Model and Expansive Learning: Creation, Instantiation, Expansion, and Re-Representation. Perspectives in education, 29(4), 87-98.
Oates, J.C. (1966). “Where Are You Going, Where Have You Been?” Retrieved from https://www.d.umn.edu/~csigler/PDF%20files/oates_going.pdf
P2PU. How Do I Make a P2P Course. Retrieved from https://p2pu.org/en/groups/make-a-course/content/bonus-task-playstorm/
Senteni, Alain. (2013). Expansive Learning. edutech.wiki. Retrieved from http://edutechwiki.unige.ch/en/Expansive_learning
WikiHow. How to Play Dungeons and Dragons. Retrieved from http://www.wikihow.com/Play-Dungeons-and-Dragons
Wizards RPG Team. (2014). Dungeons and Dragons Players Handbook. Wizards of the Coast
Origami Circuits: Remixed
Last week I created a lesson plan in which students combined origami with circuits to generate a creative use of circuit learning. The lesson offers a way for students to wire an object in the third dimension as they manipulate their paper construction to allow a circuit to be built around and through it.
This week we were asked to research two articles in relation to implementing new teaching strategies with technology using empirical data from known teaching strategies. We were to take this information and edit our lesson plan. My revisions post research are done in red. The two learning paradigms I looked into were expansive learning (Engestrom) and multiple intelligences (Gardner). After researching each of these ideas I went to the MSU online library to find more recent journal articles relating to these topics, see the references below. For those of you unfamiliar with either concept, expansive learning is cyclical, essentially following the sequence of question, explore, model, and repeat (Molomo, 2011) and “[multiple intelligences] theory states that the human brain is modular and that all humans possess at least seven intelligences” (Tai, 2014) which we will not fully explore today.
I was able to gather information from these articles that allowed me to better understand the implementation of my lesson plan involving circuits. When I first created the plan, I worried that the origami creation would steal the show; students would either focus too much on the art aspect or they would deem it “not for me” and not work as hard. The article by Molomo depicts a classroom study involving game design and how this promoted learning. Reading the article I realized the new technology needs to be used as an “object” until it is understood before it is used as a “tool” (Molomo, 2011). This can be applied to the circuit stickers or to the origami. Both are to be used as tools in helping students understand circuitry. Hence, the lesson plan does not change, however, its implementation does. The origami is not “some art we are attaching stickers too” rather it is a means to “discover circuitry in a 3-dimensional model.” In understanding this I realized it was important to have more of a multi-step attitude towards using the equipment as tools and creating an expansive learning environment:
- Question
- Explore
- Model
Or, as CEP811 presents it:
- Learn
- Explore
- Create
I redesigned the lesson plan with this in mind. Giving the students more “play” time for questions and exploration while still leaving in the pieces where they do follow instructions on using new “tools” in their quest for understanding.
Secondly, I took another look at the group work in the project. I want students to be able to take what they have learned and run with it. Therefore, I wanted to break the groups down and give each member a task to complete – as chosen by the students. “To help students’ diversified learning, effective teachers should strive to understand and recognize the students’ intelligences” (Tai, 2014). Here I added a place for students to self-assess. They are asked to identify their strengths and weaknesses within the project before creating their group. Each student can then play a roll in the group according to their strength and ability.
I am now really excited to test out this lesson plan in my classroom. I will let you know how it goes.
Once again, for the lesson plan, click here.
References:
Molomo, B. (2011). The Game Object Model and Expansive Learning: Creation, Instantiation, Expansion, and Re-Representation. Perspectives in education, 29(4), 87-98.
Tai, F. (2014). Exploring multiple intelligences. The Journal of Human Resource and Adult Learning, 10(1), 11-21. Retrieved from http://ezproxy.msu.edu/login?url=http://search.proquest.com/docview/1554975773?accountid=12598
Origami Circuits: A Story of Repurposing
This week in CEP811 we were asked to do add a maker technology to some type of thrifted, or repurposed, item or activity. We watched a video by Punya Mishra on how teachers need to be able to creatively balance content, pedagogy, and technology. As this is a hands on class we were asked to develop a lesson plan that involved a new technology and combined it with a repurposed item we found in a thrift store or our own basement.
My technology: Circuit Stickers
My basement item: An origami set

We then had to write a lesson plan for this juxtaposition of these two things.
As a high school physics teacher I am always looking for hands-on ways for my students to understand a new concept. Therefore I did not take the circuit stickers beyond the basic lesson of circuit building. What I did add was my own personal interest in art and holidays. I formulated a way for students to work individually to build a circuit, collaborate to create a complex circuit, and show their identity in the artistic addition of the lesson.
Working in a school where students work online at their own pace it is difficult to establish a sense of community and also to get students involved in external projects (not on the computer). Students do, however, get very excited whenever they can make a contribution to the classroom’s makeup – in this case it would be the decor.
On the wall of my classroom is a school-wide board game where students are rewarded for positive behavior and academic success. They have really enjoyed adding art to this wall in the past so I am hoping that even though this lesson is directed towards physics, the cross-curricular art aspect should go over well with the students I am working with.
Therefore, the lesson plan I have created supports learning in the following:
1. The artistic aspect will motivate students to be successful in their project
2. The display of their project will motivate students to persevere through any challenges
3. The circuit building is done through the use of colored lights and copper stickers which the students I currently teach will love as they do not get much hands on experience. Stickers are a familiar entity used in a new way. It is a comfortable way to try this new skill of circuit building.
4. The collaboration at the end will help students in building the community of collaborators and creative thinkers that I am working towards.
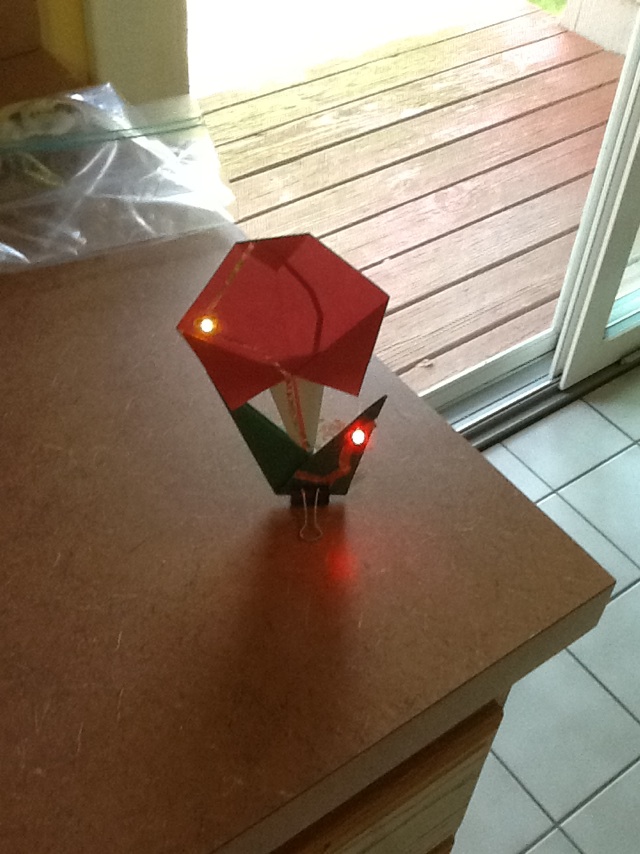
The finished project will look something like this:
How to build this glowing flower:
1. Make an origami flower. I am not an expert on this so I will just direct you to this site: Origami Instructions. Your final flower should look like this:
2. Choose a spot for the battery. I chose between the petals as you will need to have copper touching the battery on each side of said battery.

3. Make a complete loop of copper sticker wire from one side of the battery, around the flower and connected to the other side of the battery.

4. Place an LED sticker light on the copper sticker such that the + side of the LED sticker links to the + side of the battery and the – side of the LED sticker connects to the – side of the battery.
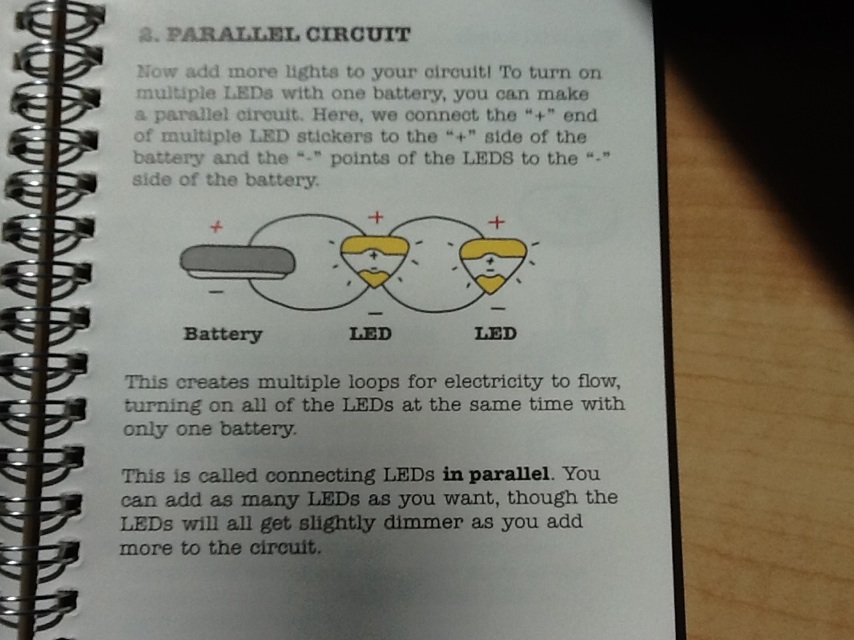
5. Add any other LED circuits in parallel to the first by adding a loop of copper sticker around the LED light. See the image below taken from the Circuit Stickers Sketchbook that is included in the purchase of the starter set.
6. Finally, decorate your flower in any way you choose to show your creativity.
Here are all the steps in a How To video I created:
Lastly, here is the lesson plan created to go with this project.
References:
Mishra, P. & Koehler, M. J. (2008) Teaching Creatively: Teachers as Designers of Technology, Content and Pedagogy. Available from Vimeo.com, http://vimeo.com/39539571
Origami-Instructions.com (2005) http://www.origami-instructions.com/easy-origami-rose.html
Learning, Making, and Gamification
Last week heralded the beginning of the next course in the CEP series I am taking for my masters degree at MSU. This first assignment, learning about remixing, we were tasked with exploring Mozilla Popcorn Maker, an in-browser movie maker that lets you upload and add media from the internet to create a remixed version of the content. We learned about the world being made up of “Makers” (Lessig). We explored the idea that everything we create was inspired by creations that came before.
In this light we were asked to choose a topic dealing with educational technology and create something new; a remix of information from credible sources. (My primary source for finding usable media was Creative Commons which I talked about in the previous post). In doing so we would 1. learn a new skill, 2. learn about legal and professional ways to find and use information online, and 3. uncover new methods to repurpose or remix functionality to eventually carry over into our classrooms.
After reading through the week’s lesson, I started my exploration of Popcorn Maker by creating a mashup of Lord of the Rings music. This turned out terribly. No worries though. One of our lessons this week was that it is OK to fail. With Popcorn Maker I was able to create something completely off the wall using solely music I found online. I felt like a world famous producer. Until I played it back… The tool was simple to use and intuitive enough that I was able to dive right into the making.
Later, I watched a tutorial on popcorn maker and even looked up some helpful tips: editing strategies, keyboard shortcuts, etc. Isn’t it amazing the wealth of information one has access to? I was able to learn a new skill – producing a remix – within an hour. Imagine what my student, who has grown up fully immersed in this technological age, could have accomplished in that amount of time.
After focusing and learning so much about play in CEP810 I decided to continue on this vein for this assignment. For my remixed video I looked up Gamification and its applications in education. A gamer myself, I have created a board game for the wall of my classroom (which you can see in the video) that grants rewards to students as they achieve academic and behavioral success. I teach in a high school and my students are ecstatic when they get to move their team forward. It was really interesting to look up research about gamification and how it relates to motivation. The video below is only a minute long. I encourage you to foray into the world of games even if you don’t want to use them in your classroom. The motivation strategies can be applied in multiple ways like focusing on gaining points rather than points lost in an assignment.
Check out my video on Gamification and Motivation below.
https://amybeth.makes.org/popcorn/2926
References
Lessig, L. (2008). Remix: Making art and commerce thrive in the hybrid economy. New York: Penguin Press.
Kapp, Karl M. (2012). The Gamification of Learning and Instruction: Game-based Methods and Strategies for Training and Education. John WIley & Sons.
WhatWeCee. (2013). The Gamification of Education. YouTube.com.
Wikipedia.org.(2014). Gamification. http://en.wikipedia.org/wiki/Gamification.
Goodhealthmag. (2010). Piano Stairs Auckland.mov. YouTube.com.
Chou, Yu-Kai. (2014) Top 10 Social Gamification Examples that will Literally Save the World. Gamification Study. Yu-Kai Chou.
Teachhub.com. (2009). Engaging Classroom Games for All Grades. Image: http://cdn.teachhub.com/sites/default/files/field/image/classroom-games.jpg. K12 Teachers Alliance.
Rich, Motoko. (2013). Gym Class Isn’t Just for Fun and Games Anymore. The New York Times. Image: http://graphics8.nytimes.com/images/2013/02/19/education/PHYSED/PHYSED-articleLarge-v2.jpg The New York Times Company.
